Back to Report on the Apiary Visit.
Construction of a Kewl Floor
During the first apiary event, we constructed a kewl floor to be used under a new hive we are starting this year. The total cost of constructing this floor was less than 4 euros. Construction time was about 20-25 minutes.
The tools required for the floor were:
- A hand saw
- A screwdriver
- A bottle of woodglue
- A crownboard
- A tin snips or other device for cutting steel mesh
- A staplegun (or a hammer and felt roofing nails)
The raw materials for the floor were:
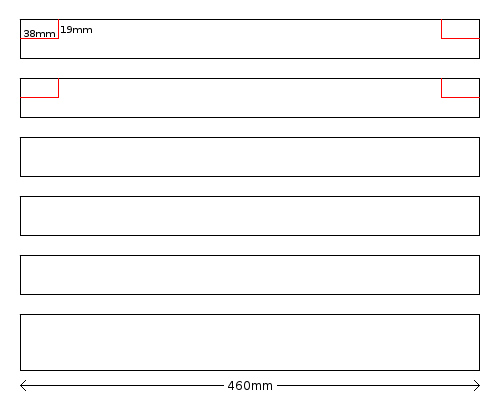
- A piece of old pitch pine flooring timber measuring 460mm x 19mm x 60mm.
(The 60mm measurement isn't critical, anything between 55mm and 70mm will be fine.) - 2 x 180cm lengths of kiln dried lathes x-section 19mm x 38mm. Available in B&Q.
- 15 30mm x 3.5mm screws
- An old steel mesh firescreen found at a recycling yard.
- A sheet of correx from the local Centra shop. Thanks Centra :)
Step 1.
- Cut 2 x 460mm pieces from 1 of the lathes and label them A.
- Cut 3 x 460mm pieces from the other lathe and label them B.
- Remove 2 pieces of waste (19mm x 38mm) from the ends of parts A as marked in red in the diagram.
Congratulations, you have completed 80% of the cuts required for the project. You should have 6 pieces of wood as shown in the following diagram and 2 pieces left over from the lathes.
Step 2.
The first phase of assembly uses 4 joints that I call quarter lap joints. During assembly, the crownboard is used to help keep the pieces square. Place the pieces marked A on opposite edges of the crownboard with the cutout sections facing upwards. Place 2 of the pieces marked B across the cutouts to form a square frame. Use some glue and 4 screws to fasten the 4 pieces together.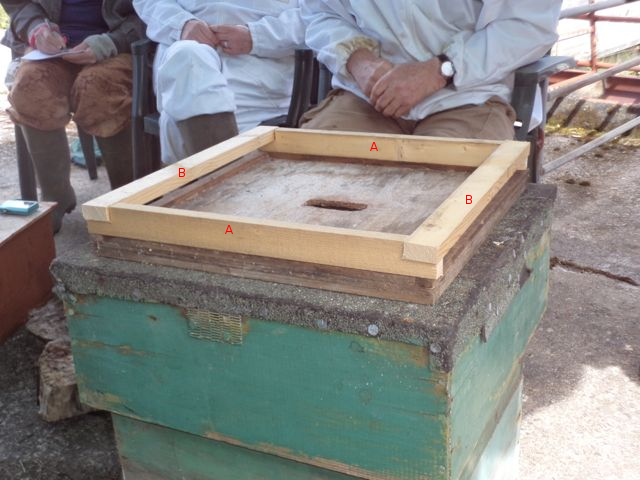
Step 3.
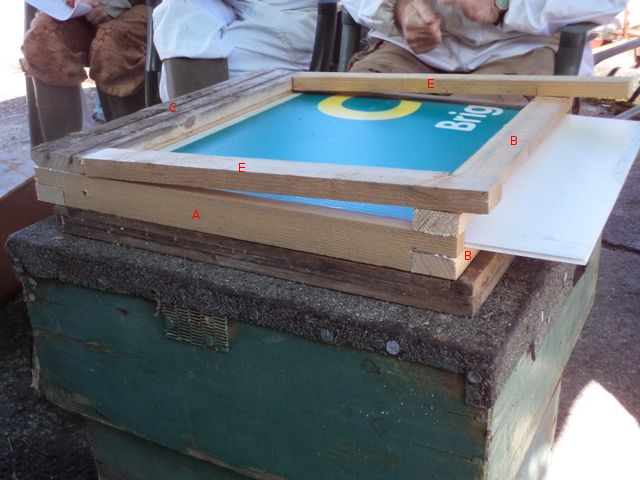
Flip the square frame upside-down. Use some glue and 4 screws to fasten parts B and C onto the edges of the frame and parallel to the other pieces marked B. Piece C will form a built in landing board when the floor is finished.

Step 4.
Flip the frame over again. Measure and cut a piece of wood (Part D) from the long piece of lathe left over from Step 1. This piece needs to fit snugly between parts A and it will sit on top of part C forming a vertical wall of the end of the landing board. When you are fastening this piece in place (3 screws), leave a gap of 8-10mm to allow the bees to get through the L-shaped entrance easily without shedding their pollen.
Step 5.
Flip the frame over again. Measure and cut 2 final pieces (Parts E) which will fasten to parts A and sit snugly between parts B and C. These pieces will form runners to hold the varroa tray and also strengthen the floor. Cut a piece of correx or thin plywood to fit the slot at the back of the floor.
Step 6.
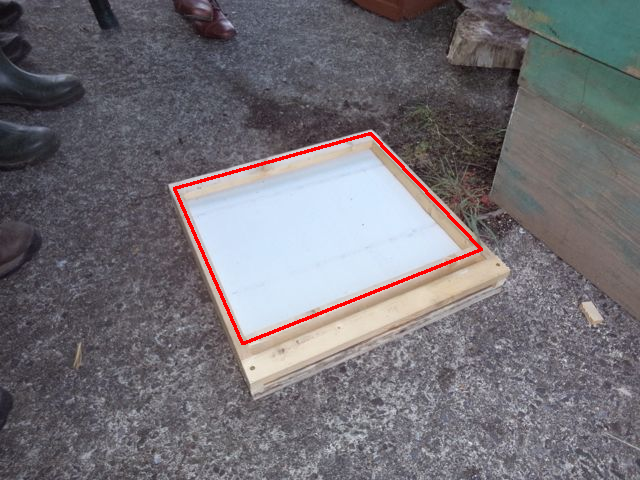
Cut a piece of mesh to fit the floor. 370mm x 460mm should be about the size you want. Fasten in place with staples or felt roofing nails to cover the area outlined in red. Make sure you don't cover the slot at the end of the L-shaped entrance.
I recommend painting only the external surfaces of the floor that will be exposed to weather. The bees can easily exit and enter through the L-shaped entrance. This floor is easy to transport due having the same footprint as the hive bodies, but also provides a landing board. The tight corners and concealed landing board make it difficult for mice to enter, and make it easy for guard bees to defend against wasps and robbers. The entrance size should be restricted by inserting scraps of wood into the entrance during times when the hive is not at full strength.
Photos provided courtesy of Michele Russell